Camera HDR Feature

After much debate, (in reality convincing myself that I needed it) I’ve finally bought myself a new camera, its the Canon EOS 760D and will replace my trusty Canon 550D which has done great service up to now. So why the change, well the increase from 18 to 24 Megapixels was a big decider plus a swivel screen and a host of new features which I wont bother everyone here today with, for the techies the specs are easy enough to look up. One of the interesting features however is a Special Scene selector which incorporates HDR backlight control.

HDR is to quote Wikipedia “High-dynamic-range imaging (HDRI or HDR) is a technique used in imaging and photography to reproduce a greater dynamic range of luminosity than is possible with standard digital imaging or photographic techniques. The aim is to present the human eye with a similar range of luminance as that which, through the visual system, is familiar in everyday life.” If you want to look it up the link is https://en.wikipedia.org/wiki/High-dynamic-range_imaging

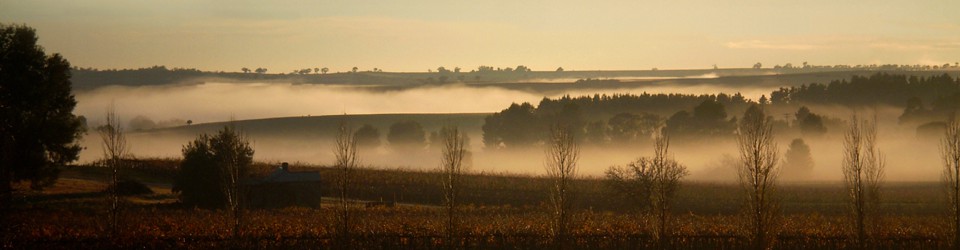
The HDR technique is something I’d read about but never tried so was pleased to find the capability within the camera which takes then combines 3 shots at 3 exposures to improve highlight/shadow detail.

2015-(189)

Having found it I had to try it out, the attached shot was taken on a beach in Queensland in late evening light where deep shadows on the beach competed with bright patches in the sky, (ISO 100, f22, 1/10 sec), often the camera doesn’t capture what the eye sees but I was pleased with the final result, the image height has been cropped slightly for presentation. Now I need to try this again in a few more locations, anyone else tried HDR? open for comments.

Advertisement

Night Shooting

Night is a fantastic time to take photographs however choosing the correct time is as important as choosing the location. My favourite is the short period of time between the sunset ending and the darkness of night being absolute when there is still some light left in the sky, sometimes the eye cannot see it but the camera will record it when taking long exposures. After this time the sky becomes a black mass and only the subject is lit.

Somewhere in the above I said long exposures, with not much light around and wanting the keep the same depth of field without increasing the ISO with its inherent noise means that you can no longer hand hold exposures, certainly not greater than 1/30 second. The obvious solution is a tripod which once set up can give exposures for as long as you need. But what if you don’t have one with you at the time, well any stable platform will do, a stone wall, a bridge parapet and I’ve even used the top of a rubbish bin (and once in a graveyard the flat stone of a tomb). In short anywhere safe where the camera cannot be moved during its exposure time.

Enjoying the Singapore night life

Enjoying the Singapore night life

I’ve attached a couple of images, the Singapore shot was taken from the bridge parapet (with my hand through the camera strap in case of an accident) and the shot in Verona of the arena was actually taken with a monopod (a single pole tripod). For the techies Singapore was ISO 100, F8 for 8 seconds and Verona ISO 100, F9 for 3.2 seconds.

Night at the Arena in Verona

Night at the Arena in Verona

Taking long exposures with a monopod can be done though it needs a little more thought. Set the camera to time delay (to give the camera time to settle once you have pressed the button) and find something to hold the monopod against ( a railing, signpost, anything). Frame and focus the image, press the button and hold the monopod in place, the countdown beeping should start, giving you time to get settled, the results can be reasonable, who said taking photographs wasn’t fun.

More images can be found in this sites galleries as well as high definition versions available through my online shops at the bottom of the page, please visit if only to view and comment.

Posters

Ever thought about creating your own posters?, its not that complicated when you consider all that is needed is an image and the right slogan, photo editing tools will allow you to add text to an image in a range of fonts and sizes. Having searched the web for some appropriate slogans I set about matching them up to some images that I had that needed something extra.

2014-(129)It seemed obvious to start with a flower, there are so many good quotations around them.

Looking deeper I came across this weather vane and the following text just jumped to mind.

2015-(009)In conclusion I’ve added this example for a little deeper thought, 2015-(010) Its not that hard once you try, I’d recommend anyone in having a go.

For those who’d prefer to just buy posters you are welcome to browse my current submissions in my online shops at Fine art America and Rebubble.

Digital Cameras

Digital cameras, don’t you just love them, I was a sceptic at first where the best image was 6mp and couldn’t stand against 35mm when printed above 6 x 4 (that’s 150mm x 100 mm for the metric fraternity). I was still old school, 35mm colour and black and white negatives plus 35mm slide film, a fairly expensive hobby where you couldn’t see your results until you spent time in the darkroom. Being expensive and limited (max 36 shots to a roll) also meant that you thought a lot more about the shot before you took it, there wasn’t a wide margin for error.

My first digital camera was a 3mp compact (a Ricoh Caplio G4 wide) and at the time considered a toy against my 35mm Olympus SLRs but the advantage it did have straight away was the ability to view the image and if necessary take it again. Image quantity was limited to the space on the SD card and given the choice then of taking hundreds of low quality images or a few high quality images the choice was clear, high quality every time, if I took a shot then I wanted the best I could get, there wouldn’t necessarily be the opportunity to take it again, after all I could always get another memory card or just dump it to a computer file. It became a great little camera to carry around in the car and given it was early days still for digitals it did produce some really nice images at 2048 x 1536 pixels.

Cable Car in the Blue Mountains

Cable Car in the Blue Mountains

That digital camera was only the first of many (attached is an image taken on it in the Blue Mountains New South Wales) and I still have it to remind me. Currently I have a Canon 550D digital SLR and wouldn’t trade back to the roll film version for anything, these modern cameras are serious tools. This one is 18 mp giving 5184 x 3456 pixels and I’ll probably upgrade again one day but we all have to work within our abilities and for the moment this works really well for me.

More images can be found in this sites galleries as well as high definition versions available through my online shop.

The Right Light

There’s a lot to be said for choosing the right time of day to take your photos, your decision determines the mood of the final image. Previously I mentioned taking photographs on a bright sunny day, everyone’s favourite time, how often have you looked at your final result and thought that the images were flat, or in high contrast (very dark areas and very bright ones), how often have you looked at the result and thought that it looked ‘washed out’?  This is because what your eye sees is not what your camera sees, the eye will compensate rapidly for changes in lighting levels as you look around, the camera of course tries to record what it monitors in that fraction of a second the image is taken and is often fooled by the sky or the sun or reflective surfaces, even those with multiple sensors embedded.

Of course we don’t always have a choice when the shot can be taken, it greatly depends on where we are at the time but when you do have a choice you can of course help by choosing not to take in the middle of the day. At this time the sun is directly overhead so there are few shadows and therefore little sculpturing to give depth and shape to objects, trees or hills and images become flat as objects blend into each other and colours fade. You will have noticed how in late afternoon when the sun is across the subject that the shadows give objects that depth and shape and also observed that the colour of the light changes from being bright and harsh in the middle of the day to becoming warmer and softer as the day progresses.

Midday landscape example

Midday landscape example

Given a choice I’d choose mid to late afternoon every time for that warm effect and about an hour before sunset when I really want to add some soft enhanced colour into a landscape shot. The first image was taken at midday, the sun is high, shadows short and the scene is flat.

Late sunshine in the Barossa

Late sunshine in the Barossa

The second shows a mid afternoon image and already sculpturing is taking effect in the tree trunk.

The third image gives an idea of how the colour changes as the day progresses towards evening with the colour of the vines changing from light brown to a warm golden brown.

More Landscape images can be found in this sites gallery ‘Australia in View’ as well as available through my online shop.

Continue reading

Australian Winter

Winter, even here in Australia just the thought of the word conjures up cold wet days, dull gloomy outlooks and evenings where we all prefer to rug up. There is another side of course, there are days where the air is so bright and clear that the colours jump out at you, where clouds in the sky add texture to what is normally a wide blue empty space all summer and where your mind screams at you to get out there and enjoy it.

Snow on the mountainside in Victoria

Snow on the mountainside in Victoria

Recently I had the advantage of being on a mountain during the winter with days of bright sunshine, clear blue skies and deep snow, ideal conditions to get away from the crowds and take those shots that you wouldn’t normally find. Just remember when photographing on snow that the light hits the snow and is reflected back, this will fool your camera into thinking that the image is brighter than it actually is and the result will be a dull grey picture. You can compensate for this by adjusting your camera compensation by a stop or two but this will vary by the day so bracket your shots, at least with digital cameras you can see what you have achieved and adjust to suit.

2012-(059)

The weather closes in

The beautiful days on arrival couldn’t last of course with a snowstorm arriving a few days later but not to worry, just more opportunities right…………..

More images of the Australian Winter can be found in this sites gallery Australia in View’ as well as available through my online shop.

There’s always time to take it

Evening rainstorm

Evening rainstorm

I’ve been asked when is the best time to take photographs, humorously the best answer is when you have a camera in your hand, mine is never too far away, my DSLR goes with me when I go out at weekends and a compact is permanently in the car, you never know when you will see something interesting, how often have you said “I wish I’d had my camera with me” when the unexpected image appears. The question of course really related to the weather and whilst the above is true enough most people associate good photographs with bright sunny days, blue skies and wisps of cloud in the sky. Generally this is fine after all who doesn’t like a sunny day however look at images that move you, when were they taken, often as not you would say sunrise or sunset or storm clouds moving over hills with the sun peering through.

Stormy Rural Landscape

Stormy Rural Landscape

Snowstorm

Snowstorm

Misty morning in England

As you have already guessed photographs need mood and therefore depend upon lighting available at the time to be really effective. I’ve taken photographs as a thunderstorm approaches, on a gloomy fog filled day, at night in the rain and even in a snowstorm on a mountainside; don’t be put off looking for a good image just because the weather isn’t kind to you. I’ve attached examples of each of these types.

High resolution versions of my photographs are available through my online shop, please enjoy.

Getting Closer

There’s nothing quite like getting in close and personal, getting in close to subjects often improves the image, a lecturer once told our camera club that if you wanted the subject to fill the frame then don’t use a longer lens just step closer, useful advice when on most occasions you just happen to have the one lens with you, though maybe not so practical when there are obstacles in front.

I have a Canon EOS 550D and often used the 18-55 IS lens and changed to the EFS 55-250 IS when the subject was just out of reach, often though that meant carrying around the zoom just in case I needed it, more unnecessary weight unless I’m heading somewhere specific and I know that I’m going to make use of it. Most days though the camera is just with me in a shoulder bag with the one lens, an EFS 18-135 IS which makes it lighter and more convenient for general use, especially when I’m climbing up hillsides on these hot days. This is Ok considering that I mostly take landscapes and use the 18mm end of the lens but every so often I find subjects where climbing closer would definitely help.

50mm-Image

50mm-Image

135mm-Image

135mm-Image

I’ve attached two images both of the same subject, a humorous haystack found in South Australia. As can be seen taking one shot at 50mm and the other at 135mm creates two very different images (in this case I couldn’t have walked closer as the farmer had built a barbed wire fence across my path).

The original concept though of getting closer still holds true, when you can do. I’m open to comment.

High resolution versions of my photographs are available through my online shop, please enjoy.

Sunset Opportunities

The sunset time of day can present more varied opportunities than just photographs of the sky with a few interesting clouds in them. That very low sun can set the mood for contra jour shots where as expected you take directly into the light, this would give a strong silhouette to the foreground structure which could be a tree, pier, building etc and show the brightness of the sky behind. The first of these two images demonstrates the basic silhouette effect achieved by shooting into the light and can be achieved at most times of the day.

Silhouette Marker

Silhouette Marker

Alternatively however the lighting of this time of day can be used to accentuate the foreground and produce almost no sky imagery at all, whilst still contra jour. This very different second image of the cyclists was taken utilising the warmth of the setting sun, this creates a very moody atmosphere.

The long ride home

The long ride home

This shot was taken whilst walking along the banks of the river Arno in Florence, the sun was directly in my eyes and all these cyclists were passing me heading home no doubt. The opportunity was too good to miss so with the opportunity of high shutter speeds from my trusty Canon EOS DSLR I listened for the cyclist coming up behind and shot as they went past.

High resolution versions of my photographs are available through my online shop, please enjoy.

Sunrise, Sunset

OK, there you are, on holiday, or down on the beach for the day, or having a relaxing stroll in the hills, its early evening and the sun is setting on the horizon when suddenly the sky lights up in gorgeous colour, yellow, orange, deep red. You know it’s only going to be there a short while and you have your camera with you, hands up those who would take the shot, then another and then watch the spectacle, well who wouldn’t, I see a lot of hands.

OK, there you are, its 5am and you’re snug in bed when suddenly the day breaks in gorgeous colour, deep purples and blues leading to oranges and yellows before disappearing altogether, your camera is on the drawers next to you so of course you leap out of bed, race out of the house and capture the moment. Better still you get up in the dark and head to a favourite location to capture the moment as it happens, hands up those who would take the shot, then another and then watch the spectacle, I don’t see many hands at all.

Sunrise in the Barossa Valley

Sunrise in the Barossa Valley

Sunset Example 1

Sunset Example 1

Sunset Example 2

Sunset Example 2

Both of course can be spectacular but you can guess which one there are more shots of. For the record I’m not really a morning person, I will take sunrise if I have to be up or specifically plan to be up but mostly I concentrate on sunsets so that I can use them as backdrops to create something else.

One thing is certain, lots of cloud formations make more interesting displays so straight after a storm is a great time. One other thing is certain, most times that you wait for a spectacular sunset to occur the light just fades away to nothing so when they do occur capture it all.

Attached is a sunrise and some example sunsets taken with my Canon EOS DSLR that could only end up as backdrops.

High resolution versions of my photographs are available through my online shop, please enjoy.