Filters

If you are into the creative aspects of photography then no doubt you have a use for filters that come with photo editing tools. I find that these filters are often very useful in creating that very different approach to an image be that creating an abstract or enhancing an original image as demonstrated in earlier posts on this site.
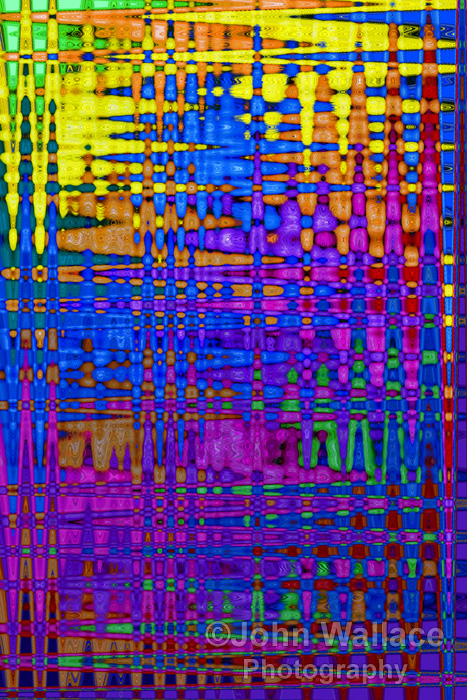
Image-1 orig

Image 1

Craquelure filter applied

Image 1 – Craquelure filter applied

There are of course many filters offered for sale on the web but there are many that are free as well. I’ve attached two flower images that started off as straightforward record shots of flowers in a local park.
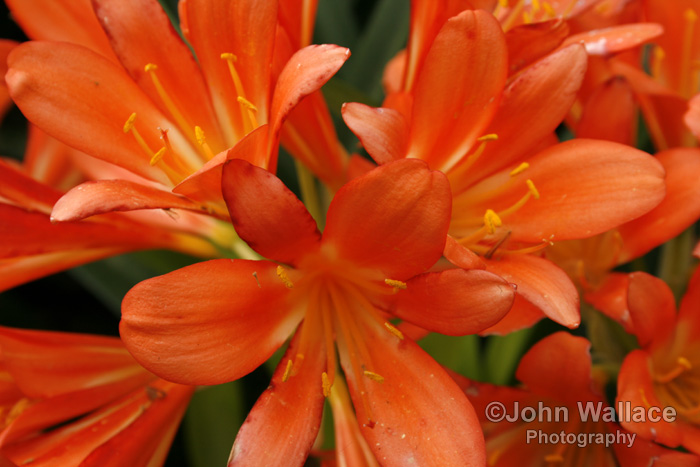
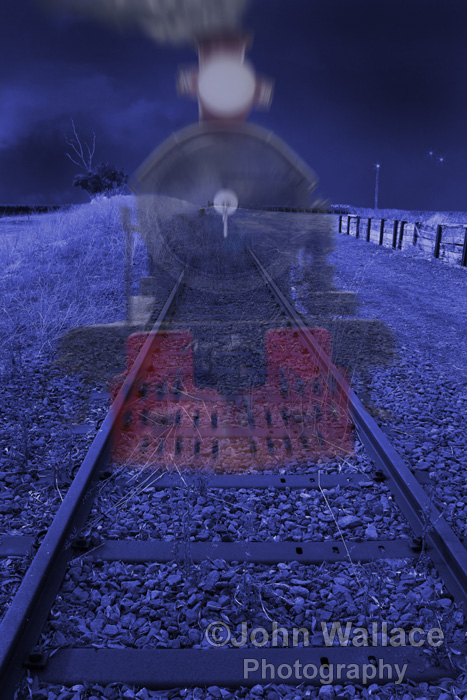


Image-2 orig

Image 2

Mashberry Filter applied

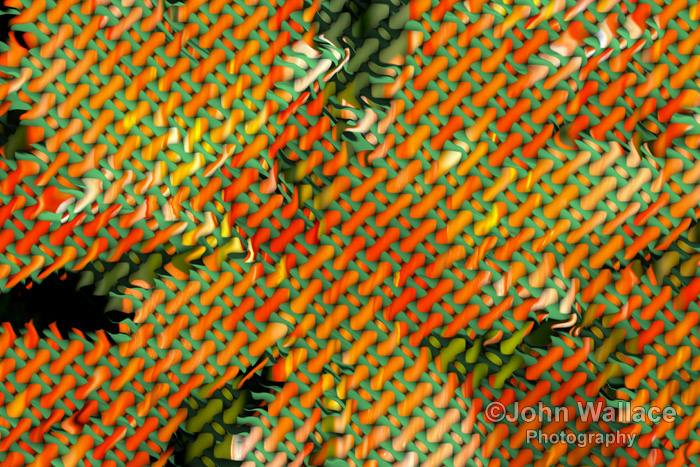
Image 2 – Mashberry Filter applied

To each of them I’ve applied a filter that was offered free on the web and as can be seen the end result is very different.


For those with an interest Image 1 is a filter called Craquelure and Image 2 is named Mashberry and both are available at http://www.redfieldplugins.com/ . Have fun…

Advertisement

Favourites

No matter what you do everyone has a favourite, with me and photography its no different, of the thousands of images in my archives there are some that I keep going back to over and over again, the ones I show when people ask me what I’m up to, the ones I choose the pc background from, the ones I print and frame for display. The more I get into this the larger the collection becomes and better cameras don’t necessarily make it easier as I still include images that I took with my first DSLRs.

So what makes a particular image a favourite?, well sometimes its the time of day, that occasion when the lighting is just right and the image comes out just as I imagined it and you know that the odds are very high against ever being able to take it again. For others it could be the amount of work that I put in afterwards to create a mood that didn’t exist at the time, that took so many steps in editing that I’d lost track of what I’d done yet I remained pleased with the final result. Whatever the reason these are the images that I copy into a separate file so I can access them immediately, if you haven’t then I can only recommend you start one.

Wind driven water pump

Wind driven water pump

I’ve attached two favourites, the first of the water vane in the wheat field brings back memories of how it was taken, the position I’d chosen was the home of hundreds of persistent flies that I had to ignore until I’d achieved the image then run to chase them off, so glad the final result was worth it.

Return from Patrol

Return from Patrol

The second Return from Patrol was a lot of work considering the subject, I knew what I wanted and it took so long editing to get it there, there are lots more on display in the Favourite Photographs Gallery, take some time and look around…

Soldiers Dawn

Sometimes I find that I’ve captured a great image of the sky and then wonder what to do with it. On this occasion it was the beautiful lighting that occurs at daybreak and then only lasts a moment or two. Having captured it, it seemed to cry out for an image in front to make it more dramatic somehow, that’s when I found this statue of the soldiers in the local park. So just grabbed the figures and reduced them to almost black, scaled back on the cropping to fit the sky image better and merged the two, the result gave me what I’d been thinking of.

Dawn of the Warrior

Dawn of the Warrior

Ok so I failed on the basic rule to not put the subject in the middle of the frame but on this occasion it seemed to work better, open for comment on this one.

More images can be found in this sites galleries as well as high definition versions available through my online shop, please visit, all comments welcome.

Take the Moon

It’s a clear night and there’s a full moon just staring down at you. Ever tried to take a photo of the moon, you have a camera right so of course you have and what do you get, a white dot in a sea of black. It’s pretty tricky right, it’s very bright and the shot looked straight forward until I took it and looked at the result.

What was obvious was that for me to get a reasonable image in the frame I needed a telephoto lens and ideally a tripod. I tried a few shots with my 250mm telephoto resting on a beanbag, left the lens on AF and achieved big patches of white blur, not good. So moved to manual focus, and started bracketing shots and achieved some reasonable (though still small) images, great if I just wanted to add a moon to a landscape.

Moon example1

Moon Example

Then I managed to get hold of a small telescope (1200 mm) and with the camera attached for once managed to fill the frame and yes I had to use a tripod but the telescope spotting scope helped as the image was being viewed using the camera preview and without the spotter I would have found searching the blackness for that elusive bright patch really frustrating. Adding to this the fact that for all long lenses the slightest movement to the tripod this end caused big movement the other didn’t help.

The end result after a lot of shots was passable but it was great fun trying to work it out not forgetting of course that the moon is moving all the time so a few minutes after I put it in the frame it was out again. I’ve attached an image showing the result and an image of the cats that I thought would work using the moon as a silhouette.

Togetherness

Togetherness

I’m certain better images can be achieved so no doubt will try again soon.

More images can be found in this sites galleries as well as high definition versions available through my online shop.

Digital Abstracts

Who doesn’t like abstracts?, I expect that there’s a few but for the rest of us those crazy patterns manipulate the eyes and the brain and yes they can make great posters. Take this abstract ‘Vortex’, well to create it I needed something that contained a lot of bright colours so I chose this shot of coloured balls as a starting point.

Vortex

Vortex

Coloured-Balls

Coloured Balls

Sunrise

Sunrise

Photo editing tools contain lots of built in filters that can be used to manipulate the image, they can twist and pull colour in all directions, slice it bend it, blur it, the list is endless. With so many variables inside each filter its virtually impossible to re-create the image again so as you play with filter after filter save a copy of what you like before you experiment further.

The balls also formed the basis for ‘Sunrise’, a totally different style of abstract. Digitally manipulating images to abstracts does have an advantage over traditional art in that the manipulation goes down to pixel level, zoom into a high resolution image and you will see patterns inside patterns.

High-Res-ZoomTo demonstrate, on view is a zoom into the high resolution version of ‘Sunrise’ as it looks at 100%, there’s detail inside detail.

With abstracts it’s like throwing paint onto a canvas, just manipulate the outcome until you like what you see.

Further digitally manipulated images can be found in this sites gallery ‘Digital Enhancement’, as well as high resolution versions available through my online shop, please enjoy.

Ghosts

Ever seen a ghost? Me neither but I have been in a number of places spooky enough for me to believe that I may have seen anything or nothing, the mind plays funny tricks like that. Trying to catch a ghost on camera of course makes the chances even more unlikely although do a web search and there are strange looking pictures out there where someone has seen something.

For fun I decided that I would like some ghost pictures and of course thanks to photo editing tools the impossible becomes practical. The two examples attached gives an idea of what can be achieved when you play around with images.

Ghost Train

Ghost Train

In ghost Train I had an image of an abandoned section of railway track and it didn’t take much of a search to find an image of an old steam train coming head on to compliment it. Built in two layers the background is darkened and colourised blue to resemble a night scene. Cut-out the image of the train to be the foreground, scale to size, add a few extras like the lamp and smoke, add some motion blur to give it that out of focus look then adjust transparency so that the background shows through.

Blue Spectre

Blue Spectre

A similar process was used for the Blue Spectre except that I wanted this image in daylight. I’d taken this shot in the beautiful old basement of the ruined abbey at Battle England and thought it created the right mood and a great background. Previously I’d taken some shots of some dancers in medieval costume so utilising the same process I cut-out one of them, scaled, blurred and adjusted transparency to suit. The end result was I believe effective and a bit of fun though I don’t image for a second that they would fool anyone, I’m open to comment.

Further digitally manipulated images can be found in this sites gallery ‘Digital Enhancement’, as well as high resolution versions available through my online shop, please enjoy.

Digital Manipulation 2

Following on from ‘Digital Manipulation 1’ which looked into a simple replace the background effect there are times when the original subject becomes the basis for a totally different image. Some time ago when I was in England I visited the ancient stone circle of Stonehenge. It’s about 5000 years old and no-one is certain about its original purpose though the site is impressive and (unfortunately for photographers) very popular which means lots of tourists, which of course means lots of people getting into the shots. A little patience (and timing) and this can be reduced to a manageable few which a photo editing tool can soon remove. A little editing work and I was left with a basic shot of a pile of stones, not the mysterious symbol of antiquity that springs to mind, fine if you want to show it in the “this is what I saw in England’ album but not for the creative file.

I do like to play around with phot editing tools though and decided to use this to create the atmosphere I wanted.

Stonehenge

Stonehenge original

Stonehenge in England

Stonehenge after processing

To start I cut out the sky and replaced it with one that was dark and broody, removed all colour and then colourised to a dark deep blue to turn it all into a night image, removed the rear stones onto a separate layer and added a burst of light into a layer in the center of the stone circle. The advantage of the separate layers enables individual adjustment without affecting the other parts of the image, added highlights to the stones catching the light and to the clouds above. A bit more adjustment in contrast here and there and I ended up with a result that is totally different to the starting point and created the mood I was after, something that could never have been achieved in a straight photo. OK I admit that this was not something that I achieved in 10 minutes and I made numerous layer versions to achieve the effect I was after but it demonstrates what can be achieved if you set your mind to it, as a bonus it was fun.

Further digitally manipulated images can be found in this sites gallery ‘Digital Enhancement’, as well as high resolution versions available through my online shop, please enjoy.

Digital Manipulation 1

Bit of a mouthful, in other words things you can do to an image to change it into something else, or enhance it. The question is often asked whether an image should be changed at all, well I think that it depends on what you are trying to achieve. If it’s a record shot then change nothing, what you record is exactly what you want to remember. However lots of us photographers are not after record shots, something for the history books or the family album what we are trying to achieve is a final impression, a mood, a feeling, creating something that you enjoy looking at and others will enjoy also. I’ve seen some wonderful landscapes taken by the pro’s who have staked a location and waited for the right season and time of day to take the shot in, I wish at times that I had the capability to do that. For most of us though when photographing landscapes nature is not always kind enough to present the ideal environment, just the right lighting or just the right colours and often this could be the only visit, you are locked into that day and time of day, so take the shot anyway and back on the computer give it a little help.


Take the original tree, remove the dull sky, boost the colour and lighting on the tree itself, embed the new sunset sky as a background and boost its colours to suit.

Happy, then merge the sandwich and save as a new image “Winter Sunset’.

The result is a more pleasing image after manipulation, of course if you prefer the original record shot then you still have the dull flat tree shot…..